My goodness, supplies are whoo pricey lately, huh?! Sure makes it tough to run out for materials to create stuff. Let's dip into and use up some leftovers for a grouping of fancy scrap plywood shelves then, shall we?
I kinda think Mike is excited that materials are costly. The other day I was lamenting that a bundle of wood lath is currently more than twice its regular price. A weird look of satisfaction crossed his face, like ah finally, no new projects.
Hmph, I don’t know why he’d think that as projects are good!
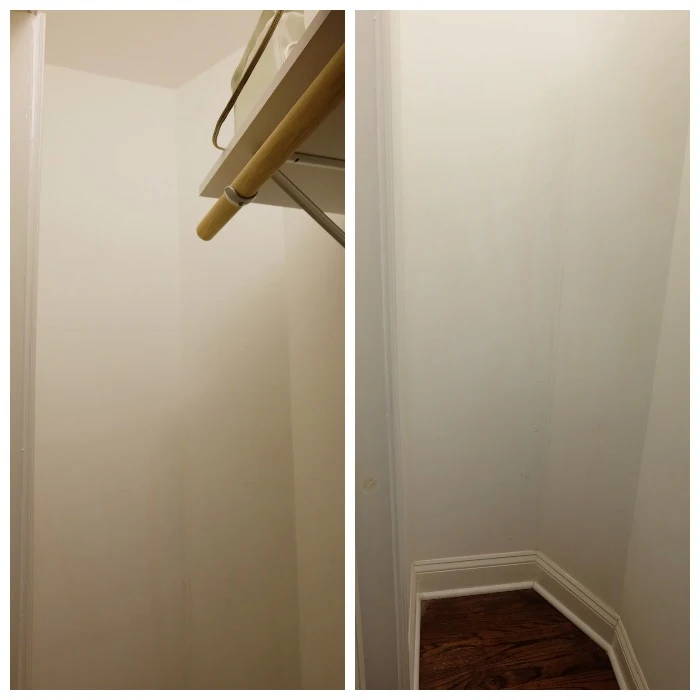
But I recently, honestly unintentionally, blew up the hall bedroom closet, aka the uh, last bastion dumping ground for items seldom touched but need to stay.
I didn’t realize how much was in that closet. Jeez louise. It was scary. I scared myself. That and I was freshly reminded again of this room's frustrations. Worst of all, I didn't even find what I was looking for either. Sigh.
But. So. It was a massive mess because that closet is way dysfunctional, hard to get at or see anything in there. Kind of inventing a project?, but not really as something had to be done about it.
All right, if you drop by the floor plans for the second floor, you'll see there's a random quirky angle going on. Not sure if the flipper thought he was being cool or edgy with this arbitrary angle for the hall but, it exists.
In the end, it's not too stupidly annoying as I can make use of the odd space with fancy scrap plywood closet shelves.
And that's the key to an organized space, no matter how small: use every available inch, especially the awkward ones. Adapt them and turn them into a positive to gain back valuable square footage.
The closet itself is the full width of the room which makes for a nice sized closet. Not so much for a bedroom though. Not even eight feet wide, this room.
Rifling through my leftover scraps strewn around the basement, there are a couple of pieces of regular plywood from the laundry room waterfall counter. Perfect!
But how to make said plywood fancy? With the uneven surface and knots and dings and whatever?
Painting was out as that only coats over the imperfections. Not a look I wanted.
Some kind of peel and stick, contact paper? Ehhh, while that's an option, it won't stick to plywood very well, it'd be constantly peeling up, plus it only barely masks those imperfections.
Ah. Ah ha. Cork. Rolls of cork.* Not only does it look nice, tidy, clean, and modern, it's inherently non-slip. Off to Menards I ran to grab two rolls, two foot by four foot each and my only expenditure ($18) for this project.
Ok!
After checking and rechecking and measuring and measuring again, it was time to get to work on these fancy scrap plywood closet shelves!
To maximize the materials, I stuck with the 18" width of the plywood which became the shelf depth which made for shelves that did not meet up with the existing white laminate shelf the flipper installed. Would I have preferred deeper shelves? Yes. But, so be it.
Cutting for the depth of the closet, I got my shelf blanks. Did I mention I bought myself a clamping straight edge?* Oh, yes, I did. Joy of joys, what a tool.
Next, cutting the angle.
How did I find that? Find as many reference points as I can. In this case, measure the width of the shortest end which was about 15-something inches. Next I measured out from the wall parallel to the back wall and eyeballed the angle corner.
Not the most accurate obviously but very close enough. Reference points are key.
All right. With my jigsaw,* I trimmed off those angled parts.
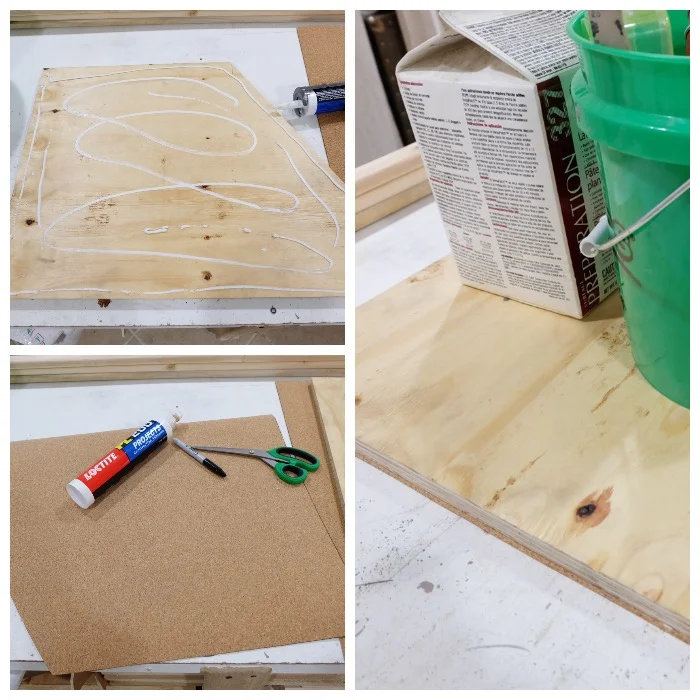
Time for the cork. Roll that stuff out very much in advance and give it time to relax from its curled state. Set a shelf panel on top of the cork and simply trace around it with a Sharpie.*
With a pair of scissors,* trim along your marker lines. Given the nature of cork, its little bits, using a knife would tear up the edges so scissors are the way to go.
If you do need to trim, use a screamingly sharp blade in something like an Xacto knife* and run the blade gently over the area to be trimmed several times. Don't whole-hog cut through in one pass.
To adhere the cork to the plywood, I used construction adhesive* pretty much because that's what I had. You can use contact cement* as well. Stick with glues that will ultimately dry and/or set up flat.
 |
| Top left, squirting on the construction adhesive. Get tight to the front edges! Below it, the cut cork. Right, weigh the whole thing down upside down. |
If need be, use some painters tape* wrapped over the edges to help stick the curly cork flat.
Ok, with that setting up, off to install some 1x2 shelf supports.
Unfortunately, and as is always the case here, there are never wall studs where I want them in this house. Instead of nailing the wood to the wall with spiffy air tools, I had to screw-in-wall-anchor* them. No biggie.
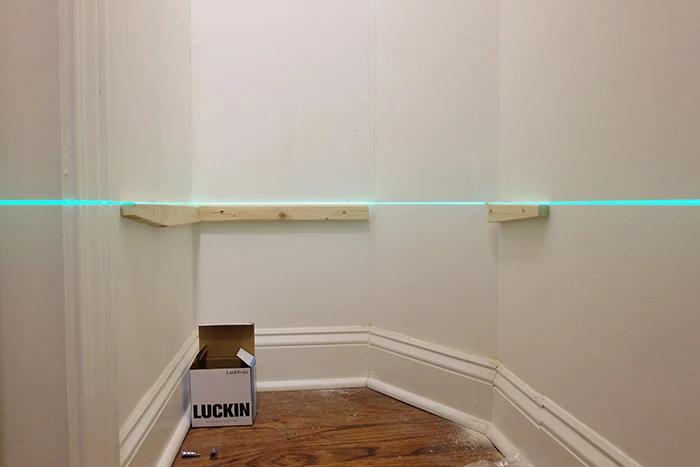
Measuring to space four shelves evenly vertically then setting up the laser level* to guide me, I drilled holes in the wood first which drilled tiny holes in the walls which I drove out a hair further with the countersink part of the bit* then sunk the metal anchors in. Screw the wood bits on.
 |
| Don't forget math. To account for the thickness of your shelf when dividing for even spacing. Math. Oh, and based on my finished design, I had to angle cut those front 1x2's to hide them a bit. See below. |
All right. Repeat three more times up the wall. Triple-check your freakin' math.
Next I painted the wood white, ya know, matchy matchy. Then it was shelf time!
 |
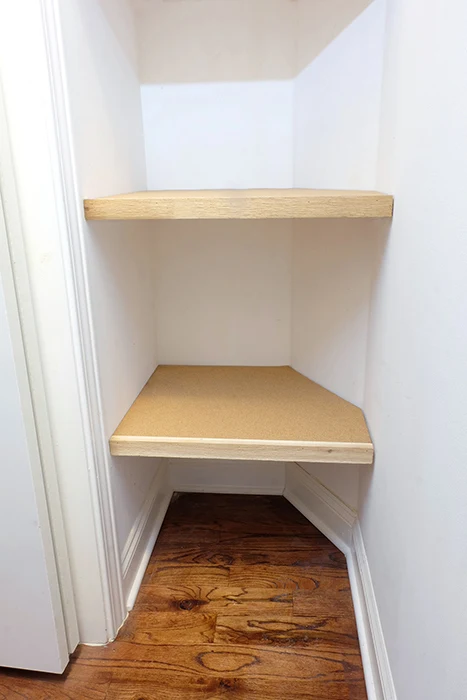
| Woot! |
Right so what about those mmm not exactly attractive ratty plywood edges? Cedar! I have some extra 1x2 cedar laying around. Bingo!
A little wood glue* and a few nails and voila! See?! Fancy scrap plywood closet shelves now!
Tada! They look clean and tidy and they're non-slip and wow, that awkward space is now useful space!
 |
| I painted the underside of the top two shelves white just so the bare plywood wouldn't make shorty me bonkers. |
In refilling the closet with its exploded contents, yeah, that's when I discovered we had a uh, a lot of toilet paper. But! Everything went back in and magically I have one entirely empty shelf and loads of space on another.
Some blanket hangers* to hang up Finn's travel blankies, some slight reorganizing, and this closet is reborn! I will sleep well tonight!
Taking a mighty big bow!
I was so proud of myself pulling this room back together and one-upping it that I made a dopey little video.
See what some fancy scrap plywood closet shelves can do?! Heh. Go forth and make those awkward spaces work for you!
Before I let you go though, oh my WORD the kind words from Apartment Therapy in their feature of our laundry room! Holy cow! Gonna print that out and frame it! Be sure to read it next!
*The rolls of cork, clamping straight edges, jigsaws, Sharpies, scissors, Xacto knives, painters tape, metal screw in wall anchors, laser levels, flip drive countersink bits, wood glue, and blanket hangers are Amazon affiliate links. The construction adhesive is a Lowes affiliate link. The contact cement is a Home Depot affiliate link. Mwah, thanks! Please see the "boring stuff" tab for more info.


Post a Comment
Please no spam or links, thanks!